Build an AI Call Center Without Code


How to Build an AI Call Center, No Code Required


Imagine this: a customer calls your business, and instead of waiting on hold, they're instantly greeted by a friendly AI agent who can book appointments, answer questions, and never forget a detail. Sounds futuristic? It’s not. With the power of conversational AI and no-code tools, building your own AI call center is easier—and more affordable—than ever.
Whether you're a solo entrepreneur, startup, or scaling support team, automating inbound calls can save time, reduce operational costs, and improve customer experience. The best part? You don’t need to hire a developer or write a single line of code.
In this guide, we’ll walk you through how to build an AI call center agent using Voiceflow, a visual platform for designing and deploying conversational agents. You’ll learn how to:
By the end, you’ll have your very own AI-powered call center up and running.
What Is an AI Call Center?
An AI call center uses artificial intelligence to handle customer calls—automatically. Instead of relying solely on human agents, an AI-powered system answers the phone, understands what the caller needs, and responds in real-time using natural language.
Think of it as a smart virtual receptionist that can:
Unlike traditional call centers that require large teams and expensive infrastructure, AI call centers are scalable, cost-effective, and available 24/7. They’re ideal for businesses that want to offer instant, reliable support—without the overhead.
Why Go No-Code?
Traditionally, creating an AI phone system meant hiring developers, integrating APIs, and managing telecom infrastructure. Not anymore.
With no-code tools like Voiceflow, you can design, prototype, and launch an AI call agent using a visual interface—dragging and dropping logic blocks instead of writing code.
Whether you're a founder wearing many hats or a product manager looking to experiment fast, no-code platforms let you:
Benefits of Using AI in a Call Center
Integrating AI into your call or contact center can transform the way you manage customer interactions. With a virtual agent handling routine inquiries, scheduling, and data collection, your team can focus on more complex cases—boosting both agent performance and agent productivity. Contact center automation will transform how efficient and fast your customer service is.
AI-powered systems also streamline call routing, ensuring callers are directed to the right place faster, whether that's an automated response or a live agent. This level of automation reduces wait times and optimizes center operations, helping your business scale without adding headcount.
The result? More efficient processes, lower operational costs, and more exceptional customer experiences. With AI, you create a system that enhances customer engagement at every touchpoint—24/7, without compromise.
In the next section, we’ll start building your first AI call center agent—from template to test call. Ready?
Step 1: Start With a Pre-Built Template
Let’s make this easy. Instead of starting from scratch, you can kick things off with a pre-built Voiceflow template that already includes a working call flow to book meetings or appointments. This is perfect if you’re new to Voiceflow or want to see how everything fits together before customizing it for your own business. Your AI call center agent doesn't need to book calendar meetings, but for this sample use-case, we'll build an AI call center that answers phones, and allows customers to book meetings or appointments. This sample is great for healthcare, movers, locksmiths, and more. If your use-case doesn't require booking meetings, this build will still give you a head start. Your agent can instead answer questions or route calls.
{{blue-cta}}
Where to Get the Template
The Voiceflow team has created a "Book a Meeting" AI workflow specifically for this use case. It includes all the core logic needed to:
✅ Pro Tip: Templates are fully customizable in Voiceflow. Once it’s imported into your account, you can tweak the questions, add more logic, and brand the experience however you like.
What You’ll Need Before Implementing AI in Call Centers:
Once you have the template, you’re ready to open it in Voiceflow and start configuring it for your business.
Step 2: Open the Workflow in Voiceflow
Once you’ve downloaded the "Book a Meeting" template, it’s time to open it in Voiceflow and start bringing your AI call center to life.
Getting Started in Voiceflow
If you haven’t already, head over to Voiceflow.com and create a free account. Once you're logged in, follow these steps:
- Click the template link to open the template in your Voiceflow dashboard.
- You’ll now see a new project called “Voice Scheduling Agent” appear in your workspace.
- Click on it to open the visual workflow editor. You may be asked to import a knowledge base. This will serve as the agent's knowledge for your business and product. Feel free to use your site, or upload specific sources (PDFs, etc) to make the agent more familiar with your product.
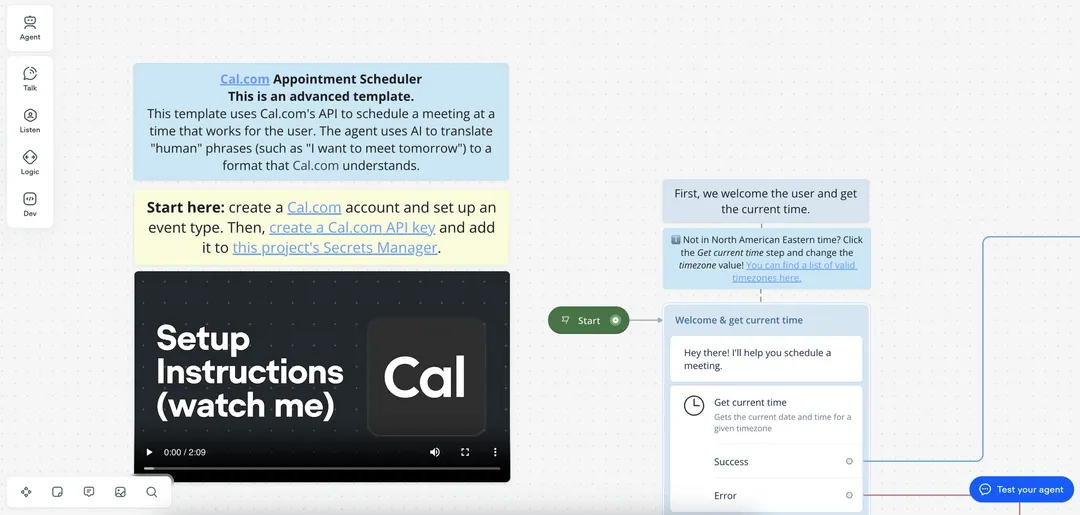
- The canvas you see is made up of drag-and-drop blocks that represent the conversation flow.
- These blocks guide the AI on how to interact with callers—from greeting them, to checking availability, to confirming bookings.
Here’s a quick rundown of what you’ll see in the template:
You Can Customize Everything
Voiceflow makes it easy to edit messages, add new logic, or change the call flow to suit your business. Want the AI to ask for a phone number? Add a new block. Want it to greet callers with your brand name? Just edit the text field.
🎯 Goal of this step: Make sure the workflow is successfully loaded and you understand the basic structure. You don’t need to change anything yet.
When you're ready, we’ll configure your time zone settings so your agent schedules appointments correctly. Let’s go!
Step 3: Set Your Time Zone
Before your AI agent can start scheduling meetings, it needs to know what time zone you're in. This ensures that the available time slots it offers—and the confirmed bookings—align with your actual calendar availability.
Set Your Local Time Zone in Voiceflow
This block is responsible for syncing the AI agent with your current time and date.
For example:
"America/Toronto""Europe/London""Asia/Singapore"
🔍 Not sure what your time zone string is?
Head to this Wikipedia page on time zones and search for your city or region. Copy the value from the “TZ database name” column.
Why This Matters
Setting the correct time zone ensures that:
💡 Pro Tip: If you work across time zones, you can even customize the flow to ask the caller for their location or preferred time zone and handle time conversions dynamically.
With your time zone set, you're now ready to integrate your booking system using Cal.com. This is where your AI agent gets the ability to actually schedule meetings on your behalf.
{{blue-cta}}
Step 4: Connect to Cal.com for Appointment Scheduling
Now that your time zone is set, it’s time to teach your AI agent how to schedule appointments directly in your calendar. That’s where Cal.com comes in—a free, open-source scheduling platform that integrates beautifully with Voiceflow.
Create Your Cal.com Account
- Set the event name
- Choose the duration (e.g., 30 minutes)
- Click Continue to save your event
- This allows your AI agent to collect and attach extra details—like the caller’s name or intent—when booking the appointment.
Link Your Cal.com Event to Voiceflow
- In Cal.com, go to your newly created event’s page.
- Look at the URL—something like:
https://cal.com/yourusername/consultation?eventTypeId=12345- The slug is
consultation - The event type ID is
12345
- The slug is
- In Voiceflow, go to the “Get Available Times” step
- Paste the event type slug into the matching field
- Paste the event type ID into the ID field
- Repeat this for the “Book Meeting with Notes” step
- Use the same event type ID here as well
🎯 This tells your AI agent what event to book and where to look for availability.
At This Stage, Your AI Agent Can:
Next, we’ll authenticate Voiceflow with Cal.com by adding your API key—this is what gives the agent permission to actually schedule meetings on your behalf.
Step 5: Authenticate Voiceflow with Cal.com
You’ve created your event type and connected the fields in Voiceflow—but for your AI call center to actually book meetings, you need to securely authenticate Voiceflow with Cal.com using an API key.
Generate Your Cal.com API Key
Add the API Key in Voiceflow
- If it’s not there, click “Add Secret”, name it
Cal API Key, and paste in your API key.
✅ Your Voiceflow agent is now authorized to communicate with Cal.com and schedule meetings in real-time.
Why This Step Matters
Without authentication, your AI agent can’t perform actions like checking availability or booking appointments. By adding your Cal.com API key securely through Voiceflow’s Secrets Manager, you ensure that:
With your API key connected, your Voiceflow workflow is now fully integrated with your booking system. All that’s left is to connect a phone number, so people can actually call your AI agent.
Step 6: Connect a Phone Number
This is the moment your project becomes real. By connecting a phone number to your Voiceflow agent, you give customers a way to call and interact with your AI—just like they would with a human receptionist.
Voiceflow makes this super simple with built-in telephony integration.
Add a Phone Number in Voiceflow
(look for the icon with three connected circles).
Assign or Import a Phone Number
Voiceflow gives you two options:
Get a New Number
Use an Existing Number
Final Setup
- This ensures callers will reach the live version of your AI agent.
🎯 Now, your AI call center agent has its own phone number—and can start taking real calls.
What Happens When Someone Calls?
Once live, your AI agent will:
All in real-time, with no human intervention.
Step 7: Publish Your Call Center AI Agent
Now that everything is set up—your workflow, Cal.com integration, and phone number—it’s time to make your AI call center live. Publishing in Voiceflow pushes your latest changes to the production environment so callers can interact with your AI agent in real time.
How to Publish Your Voiceflow Agent
This takes you to the Deploy tab.
🚀 Your AI agent is now officially ready to take calls from the public.
Don’t Forget to Test First
Before you hand out your new AI phone number to customers, it’s a good idea to run a quick test yourself (we’ll cover that next).
Publishing updates in Voiceflow is fast and flexible—you can always come back to tweak flows, improve messages, or add new logic and re-publish with one click.
At This Point, You’ve Built:
👉 Ready to give it a spin? Next, we’ll test your AI agent to make sure everything is running smoothly.
Step 8: Test Your Agent
Your AI call center is live—but before sharing the number with customers, it’s time for a test drive. This step helps you catch any last-minute issues and ensures a smooth caller experience from start to finish.
Make a Test Call
- Greets you
- Asks what day you'd like to book
- Offers available time slots from your Cal.com calendar
- Confirms the booking
- Asks for your name and/or additional notes
🎯 Tip: Try intentionally giving unexpected answers or silence to see how your agent handles edge cases.
Check Your Calendar
Once the call is complete, open your Cal.com dashboard or linked Google/Outlook calendar. You should see:
This confirms your AI agent is scheduling correctly, handling data, and syncing with your calendar in real time.
Troubleshooting Tips
If something doesn’t work as expected:
Congrats! You’ve Built a Working AI Call Center Agent
You now have an inbound AI phone agent that:
Final Notes: Customize and Scale Your AI Call Center
You’ve built a fully functional, no-code AI call center—but this is just the beginning. With Voiceflow’s flexibility, you can continue expanding your voice agent to better fit your business needs and deliver even more value to your customers.
{{blue-cta}}
Ideas for Customization
Want to go beyond booking appointments? Here are a few simple enhancements you can make:
Add branches in your flow to respond to FAQs like hours of operation, pricing, or location.
Let callers choose from options like “Book a consultation,” “Talk to support,” or “Leave a message.”
Use Voiceflow’s intent recognition to understand why someone is calling—and route them accordingly.
Set up a fallback that transfers the call to a live human agent if the AI can’t help.
Log call data and appointments into tools like HubSpot, Salesforce, or Airtable via webhooks.
Why Voiceflow Is the Best Platform to Build AI Call Centers
Voiceflow makes it easy to:
Whether you’re automating inbound sales, customer support, or appointment scheduling, Voiceflow gives you the tools to scale fast—without code.
Ready to Build Your Own AI Call Center?
You don’t need a developer. You just need an idea—and a platform that brings it to life.
🎯 Sign up for Voiceflow to start building your AI agent today
📥 Download the “Book a Meeting” template from the YouTube walkthrough
📞 Connect a number, go live, and never miss a call again